SRB2 Level Editing Made Easy
What All This Coordinate Stuff Really Means
This coordinate stuff you've been working with is how SRB2 levels are made. It's an overhead view of a level (which is why we sometimes call it a map). The X and Y you've been dealing with are the X and Y in the actual game.What you're probably thinking is, "How do I control objects' heights, then?" Good question. And, as luck would have it, I have a good answer.
Right-click the first sector you made. The one that was a square, then a triangle, then a diamond, and is now some funny four-sided thing. And select Properties. You see a dialog box come up like this one:
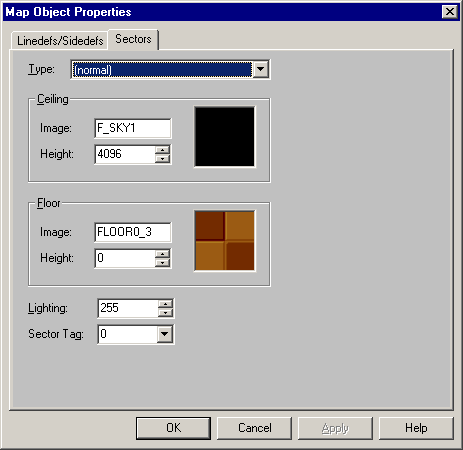
There you go! Here you can set the ceiling and floor of that sector — the heights of each and the images they use. (Don't worry if the values are set a little differently.)
The heights are in units. Same units you've been using when doing coordinate stuff, except here you're not setting an X coordinate or Y coordinate, you're setting a Z coordinate — or a height. Set the ceiling height to 4096 and floor height to 0 if you haven't already.
You can use negative heights for sectors, but it's not recommended because sometimes they cause problems. If you're wondering why the ceiling height is 4096 instead of 4000, this is because 4096 is a multiple of 64. You don't have to use multiples of 64, but it's best to stick to them most of the time because it makes it easy to line up wall textures. Most wall textures are sized in multiples of 64. The first few multiples of 64 are: 0, 64, 128, 192, 256, 320, 384, 448, 512, 576, 640, 704, 768, 832, 896, 960, 1024. You will probably memorise them after a while. Until then, there's always Windows Calculator.
The "Image" is the flat to use for floor or ceiling. Images on floors and ceilings are called flats. Remember, on walls you have textures, on floors and ceilings you have flats. You can type in the name of a flat or click on the image box to select one from a list. Some of the flats will look slightly messed up because Doom initially only allowed flats sized 64 by 64 pixels (and 64 by 64 units — same thing in this case), whereas SRB2 has been extended to allow 128x128 flats and larger. I had to shrink the large flats back down to 64 by 64 when I made graphics.wad, so keep in mind that a few of them have been shrunken.
F_SKY1 is a special flat that corresponds to the sky. Which sky you get when you say F_SKY1 is defined elsewhere, in the level header (covered later), so you can't decide for now. Don't try using F_SKY2 or F_SKY3; they don't exist.
Here are some non-special flats that you might find useful for the time being:
FLOOR0_3 - Rock flat from Greenflower Zone.
FLOOR0_6 - Generic grass, used in Greenflower Zone and Techno Hill Zone.
DEM1_4 - Grass with flowers on it, used in Greenflower Zone.
SLIME16 - Floor from Deep Sea Zone (already used in several multiplayer levels).
TLITE6_1, TLITE6_5, TLITE6_6, FLOOR6_2 - Rock floors from Red Volcano Zone (already used in several multiplayer levels).
DEM1_2 - Leafy flat from Wood Zone (which is not a level in SRB2, at least not anymore).
DEM1_5 - Sand (was used in a SRB2 Xmas level).
FLOOR3_3 - Rock flat from Techno Hill Zone.
FLOOR1_1 - East/west bridge floor (you'll learn how to make bridges later, when we cover 3D blocks or FOFs).
FLOOR1_7 - North/south bridge floor.
For now, we'll set our sector 0 — the four-sided sector that's not rectangular — so that it has the following settings:
Ceiling Image: F_SKY1
Ceiling Height: 4096 (a good height for sky)
Floor Image: FLOOR0_6 (grass)
Floor Height: 0
Come to think of it, set up your other two sectors the same way. Except set sector 1 (remember you can mouse-over to see the sector number) to have a floor image of FLOOR0_3 (rock from Greenflower Zone), and set sector 2 to have a floor image of DEM1_4 (grass with flowers on it).