SRB2 Level Editing Made Easy
Adjusting Heights and Dealing with Wall Textures
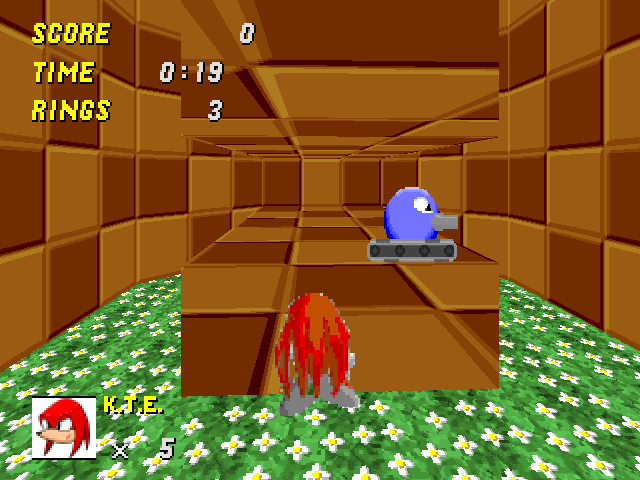
Real pity that our level has floors all at the same height. Let's move one of the floors up some, shall we?The sector with FLOOR0_3 (the square rock pattern) for a floor doesn't seem to "fit" with the other two sectors (both grass), so let's have it be the one to move. Edit the Properties for that sector and set them like this:
Ceiling Image: FLOOR0_3 (this sector will have an actual ceiling instead of sky)
Ceiling Height: 128
Floor Image: FLOOR0_3 (same as it was before)
Floor Height: 64
Remember to use increments of 64 when you can. Now save and try playing the level. Again, quit when you're done.
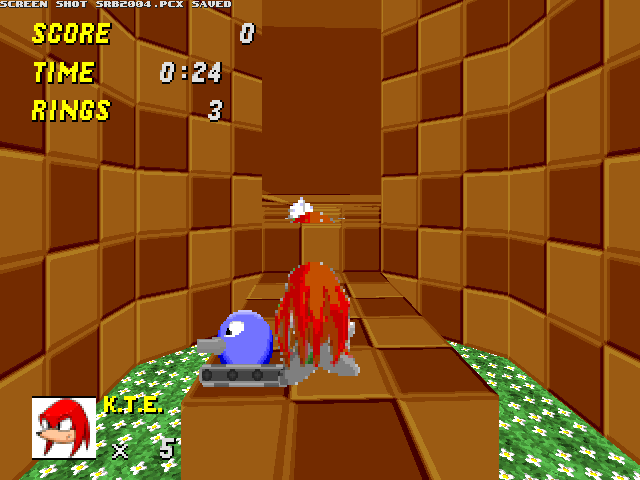
See a problem there?
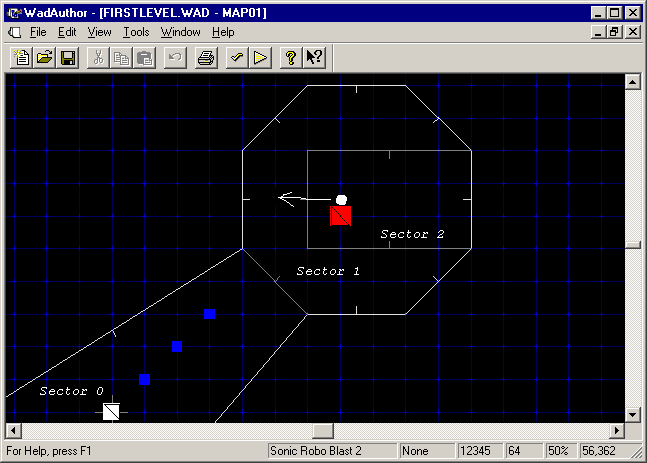
Heck yes, you see a problem! There's a bunch of weird stuff above and below the sector whose height you changed. (If you used OpenGL, it might not look quite like this, but it won't look right.) To get to the bottom of this, let's first model where you are standing, using the map in WadAuthor and some added notes.
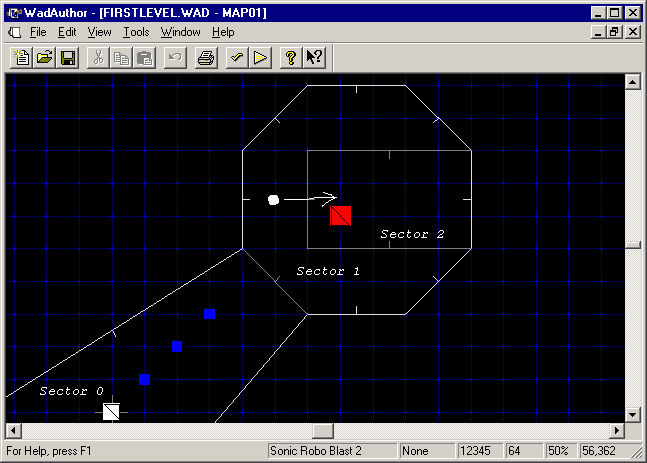
Yes, I zoomed in. So sue me. You don't need to zoom in yourself. I only did that to make everything visible.
In those screenshots I took, you are standing where the big white dot is — in sector 1. And you are looking past a certain linedef into sector 2, as indicated by the arrow.
It so happens that each linedef has one or two objects called sidedefs. If the linedef is one-sided (shown as white in WadAuthor), it has one sidedef. Otherwise, if it's two-sided (and therefore shown as grey in WadAuthor), it has two sidedefs.
Each sidedef, besides corresponding to a linedef, also corresponds to a sector. To each two-sided linedef, there is a front sidedef and a back sidedef. Let's forget about the level we were working on for a minute, and look at a generic diagram of a two-sided linedef:
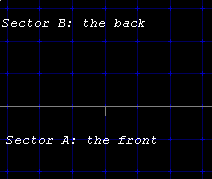
There's part of a linedef there, in grey. The little line points toward sector A. This means that the "front sidedef" of this linedef is what you see from sector A. The "back sidedef" of this linedef is what you see from sector B.
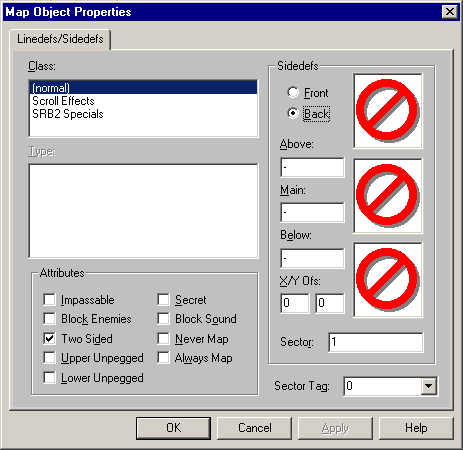
But I haven't really told you what a sidedef is yet. Going back to our map, right-click the linedef you see in the model above (the one the player represented by the big white dot is looking through) and select Properties:

Ignore the stuff outside of the "Sidedefs" frame for now. Notice in the bottom of the "Sidedefs" frame the textbox labeled "Sector." This indicates what sector that sidedef belongs to. Also notice that the radio button for "Front" is selected; you can switch between the front and back sidedefs using the radio buttons at the top.
More importantly, notice that the front sidedef belongs to sector 2 while the back sidedef belongs to sector 1. If you cancel out of the properties window for a moment, you can see that that's exactly what should happen. The linedef we're looking at has its little line pointing toward sector 2, whereas sector 1 is on the other side. So the front sidedef should belong to sector 2 and the back sidedef should belong to sector 1. Now bring that Properties window back up again.
(At this moment, I should warn you of a weird bug in WadAuthor. If you switch between the front and back sidedefs more than a few times, some of the information will get screwed up and, if you press OK, save incorrectly. It's safe to switch from "Front" to "Back" to "Front" again, but if you accidentally switch between front/back more than that, you should press Cancel, reopen the Properties window, and make your changes again — just to be safe.)
See the text boxes that say "Above," "Main," and "Below"? (The three image boxes to the right — currently all displaying circle-with-a-slash symbols — correspond to those text boxes.) They're used for selecting textures. Textures are the pictures on walls, flats are the pictures on floors and ceilings. If a texture is set to -, that means no texture.
Here I repeat my diagram for your convenience:
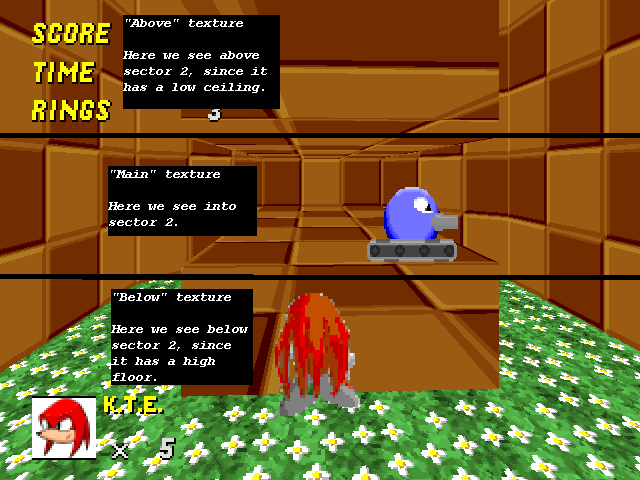
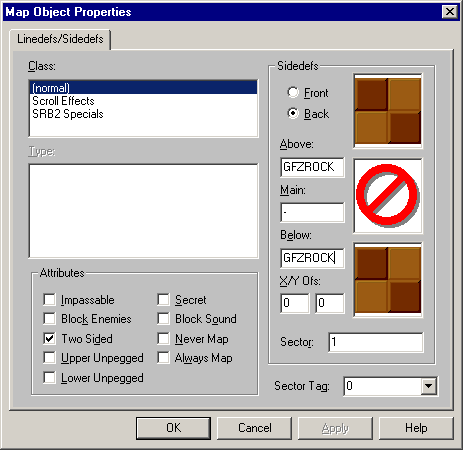
The in-game problem occurs when we're standing in sector 1. So we want to edit the sidedef corresponding to sector 1, which as we noted before happens to be the back sidedef:
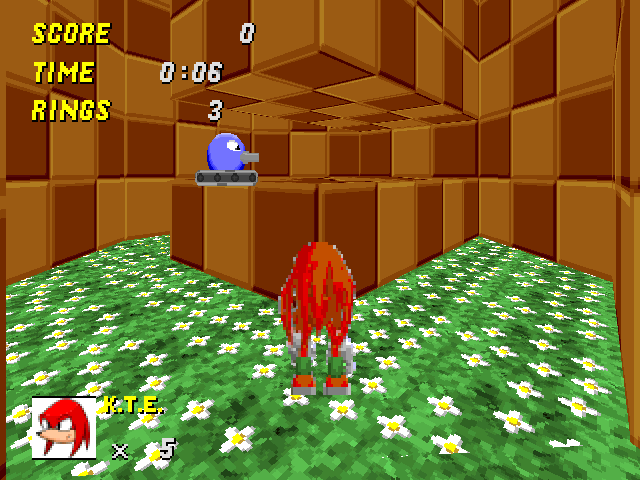
Three textures are there, Above, Main, and Below. What do they mean? Well, when we're standing in sector 1 and looking into sector 2, there are three parts to what we see. In the middle part, we see into sector 2. But sector 2 has a higher floor than sector 1, so we can also see something Below sector 2 (note the capitalisation, which is a hint at what's coming). And sector 2 has a lower (much lower) ceiling than sector 1, so we can see something Above sector 2. Or, if you prefer a visualisation based on one of our in-game screenshots:
That should show you where everything goes. Or at least, where everything ought to go.
Since, in the place where the "main" texture would go, we can see into sector 2, we don't need to have a "main" texture. We can leave that as a single dash (a -, that is) for no texture.
But for the "above" and "below" textures, we obviously need something. There isn't any sector to look into up above or down below.
So we need to set the "above" and "below" textures. As with flats, you can type in a texture name, or click on one of the pictures to select it from a list. Variable-sized textures were allowed by Doom, so WadAuthor supports them fine; I haven't had to shrink any. Let's set those two textures both to GFZROCK, a rock texture used in Greenflower Zone and corresponding to the flat FLOOR0_3 (and also what our outside walls were set to by default):
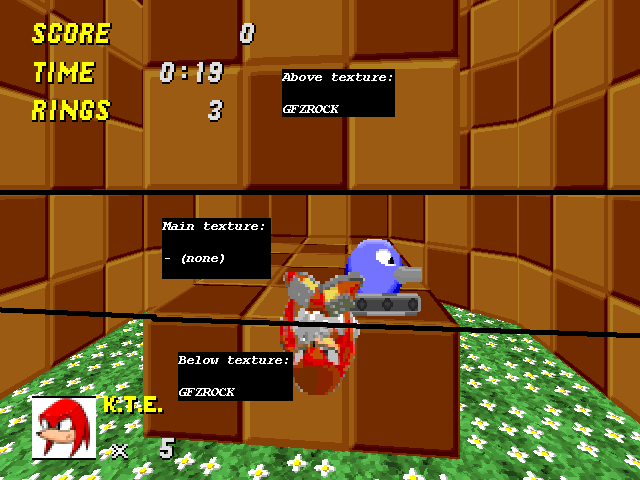
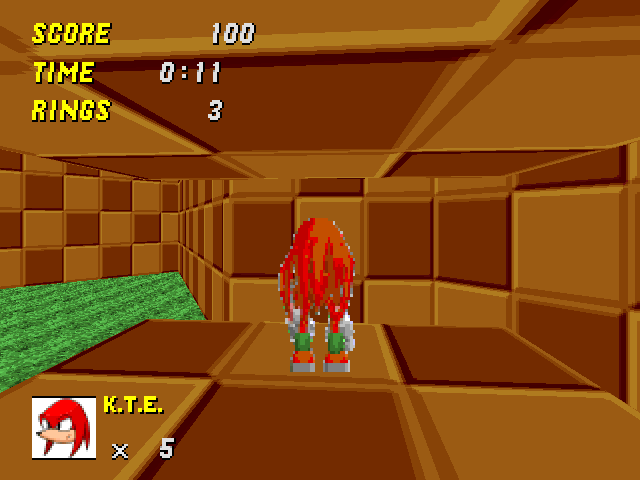
Now save and try the level again. (It still has no exit, of course, so you'll have to quit.)

All right, that looks good. You can see the breakdown again of different parts of the sidedef and what they look like:
Oh, but wait. Let's not get too confident. Look at this monstrosity:
There are still two other sidedefs we have to set Below and Above textures on. Do it the same way as you did the first time. And remember to look at which side the linedefs are facing so you can select the appropriate sidedef to add textures to. When you're done, you should see this:
Make sure everything looks fine and dandy from the other side as well.
If you understand all this stuff now, you can move on to the next section. But if you're still puzzled at why you had to set textures for the back instead of the front, read on.
Let's reverse our model so that we're looking from sector 2 into sector 1:
You can't tell from this model, because I blotted it out to draw my arrow (sorry about that), but the little line on the linedef (the one our path of vision crosses) points to the right (or east if you prefer), into sector 2. That means the "front" sidedef is determining what you see when you stand in sector 2 and look into sector 1.
So let's stand in sector 2 in-game and look into sector 1. We see this:
Let's visualise the texture breakdown as we did before:
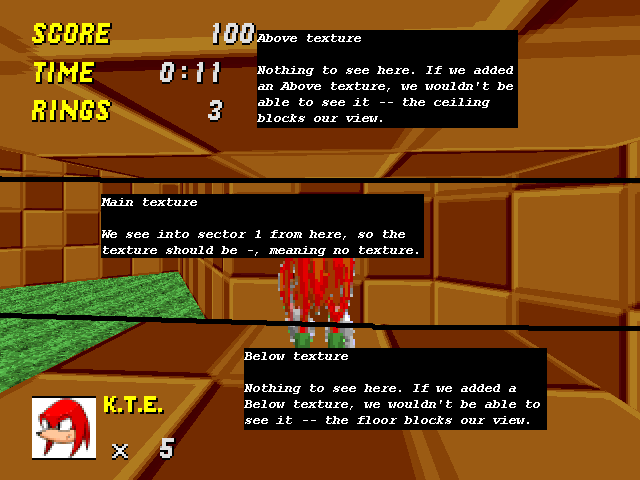
Hopefully the above image is self-explanatory. We could add Above and Below textures for the front sidedef, but we wouldn't be able to see them because our view would be blocked by the floor and ceiling of the sector we're already in.
Of course, if you don't want to have to think about this all the time, you could just set Above and Below to GFZROCK on both sides — the extra, invisible textures won't hurt anything.